Risograph Printing at ARTSLab
What is Risograph?
A Risograph is a high-speed digital printing system that uses a stencil-based process to create vibrant, textured prints. It’s known for its distinctive aesthetic, playful registration, and bold inks. Prints can be made from either digital files or physical illustrations and collages. ARTSLab provides access and training on our RISO MH9450, a two-color digital duplicator that can print up to 150 pages per minute.
Who can use the Risograph?
Only UNM faculty, staff, and graduate students can use the Risograph at ARTSLab. All printers must first attend one of our training sessions. Access for Undergraduates follows the same policy as other ARTSLab resources. Undergraduates:
- Must be working on an interdisciplinary project or line of study;
- Find and secure sponsorship from a Faculty member who is familiar with their project or coursework;
- Set up an initial meeting with ARTSLab staff with their Faculty sponsor in attendance to discuss their intended use.
- Complete a training session and pay the same one-time fee as their graduate student counterparts in their respective colleges (CFA vs non-CFA).
Non-UNM users may not use the Risograph. See ARTSLab Risograph Access Guidelines & Terms of Use for more information.
Questions? For general questions and planning class projects reach out to artslab@unm.edu. For technical printing and design questions reach out to danieladelmar@unm.edu.
Get started printing!
Find the schedule of upcoming trainings below or book a time slot to print.
Risograph Detailed Printing Information
Printing Costs
All users, regardless of faculty or student status, must first successfully complete a group training session to use the Risograph. The chart below shows the fees for different types of users.
*Please note that we offer a $50 discount for all students off of the training fees listed below.
| User Group | Access to Riso? | Fee |
|---|---|---|
| Faculty & Staff, within College of Fine Arts | Yes | $150 |
| Graduate Students, within College of Fine Arts | Yes | $100 |
| Undergraduates, within College of Fine Arts | Approval needed | $100 |
| Faculty & Staff, outside CFA | Yes | $200 |
| Graduate Students, outside CFA | Yes | $150 |
| Undergraduates, outside CFA | Approval needed | $150 |
Once you have completed the training, printing costs during your individual sessions are calculated by the number of impressions. One impression is considered a pass through the machine—regardless of if you are printing 1 or 2 colors at a time. For example, 1-2 colors is one pass; 3-4 colors per sheet takes 2 passes, 5-6 takes three and so on. Whatever your paper size, each impression costs $.20.
Current Workshops
ARTSLab offers introductory workshops throughout the academic year. One-on-one training sessions are based on ARTSLab staff availability. If you are interested in class projects involving the risograph, we ask that you attend one of training sessions beforehand. As a research facility, we are interested in transdisciplinary applications of risograph printing. Please contact us directly regarding special projects.
RISO Group Training Signup.xlsx
Learn the basic training needed to gain access to the Risograph at ARTSLab (131 Pine Street NE). This 2-hour group workshop introduces the basics of risograph (riso) printing and you will leave with an understanding of how to use this print technology to create zines, fliers, posters, and other printed matter on a 2-drum machine. Workshop participants will learn how to best maximize the many quirks of riso printing to achieve striking results. Limited to 5 participants at a time. Sign up for one of the following times at the link above.
If you are unable to make the scheduled workshops dates, please reach out to the ARTSLab Riso Assistant to get on the waitlist. (danieladelmar@unm.edu)
Our Inks
Our machine uses plant-based inks in a variety of colors designed specifically for the Risograph process. Riso printing is a spot color printing method, meaning that it works best using between 1 and 4 inks. However, it can be used to mimic process printing, also known as CMYK.
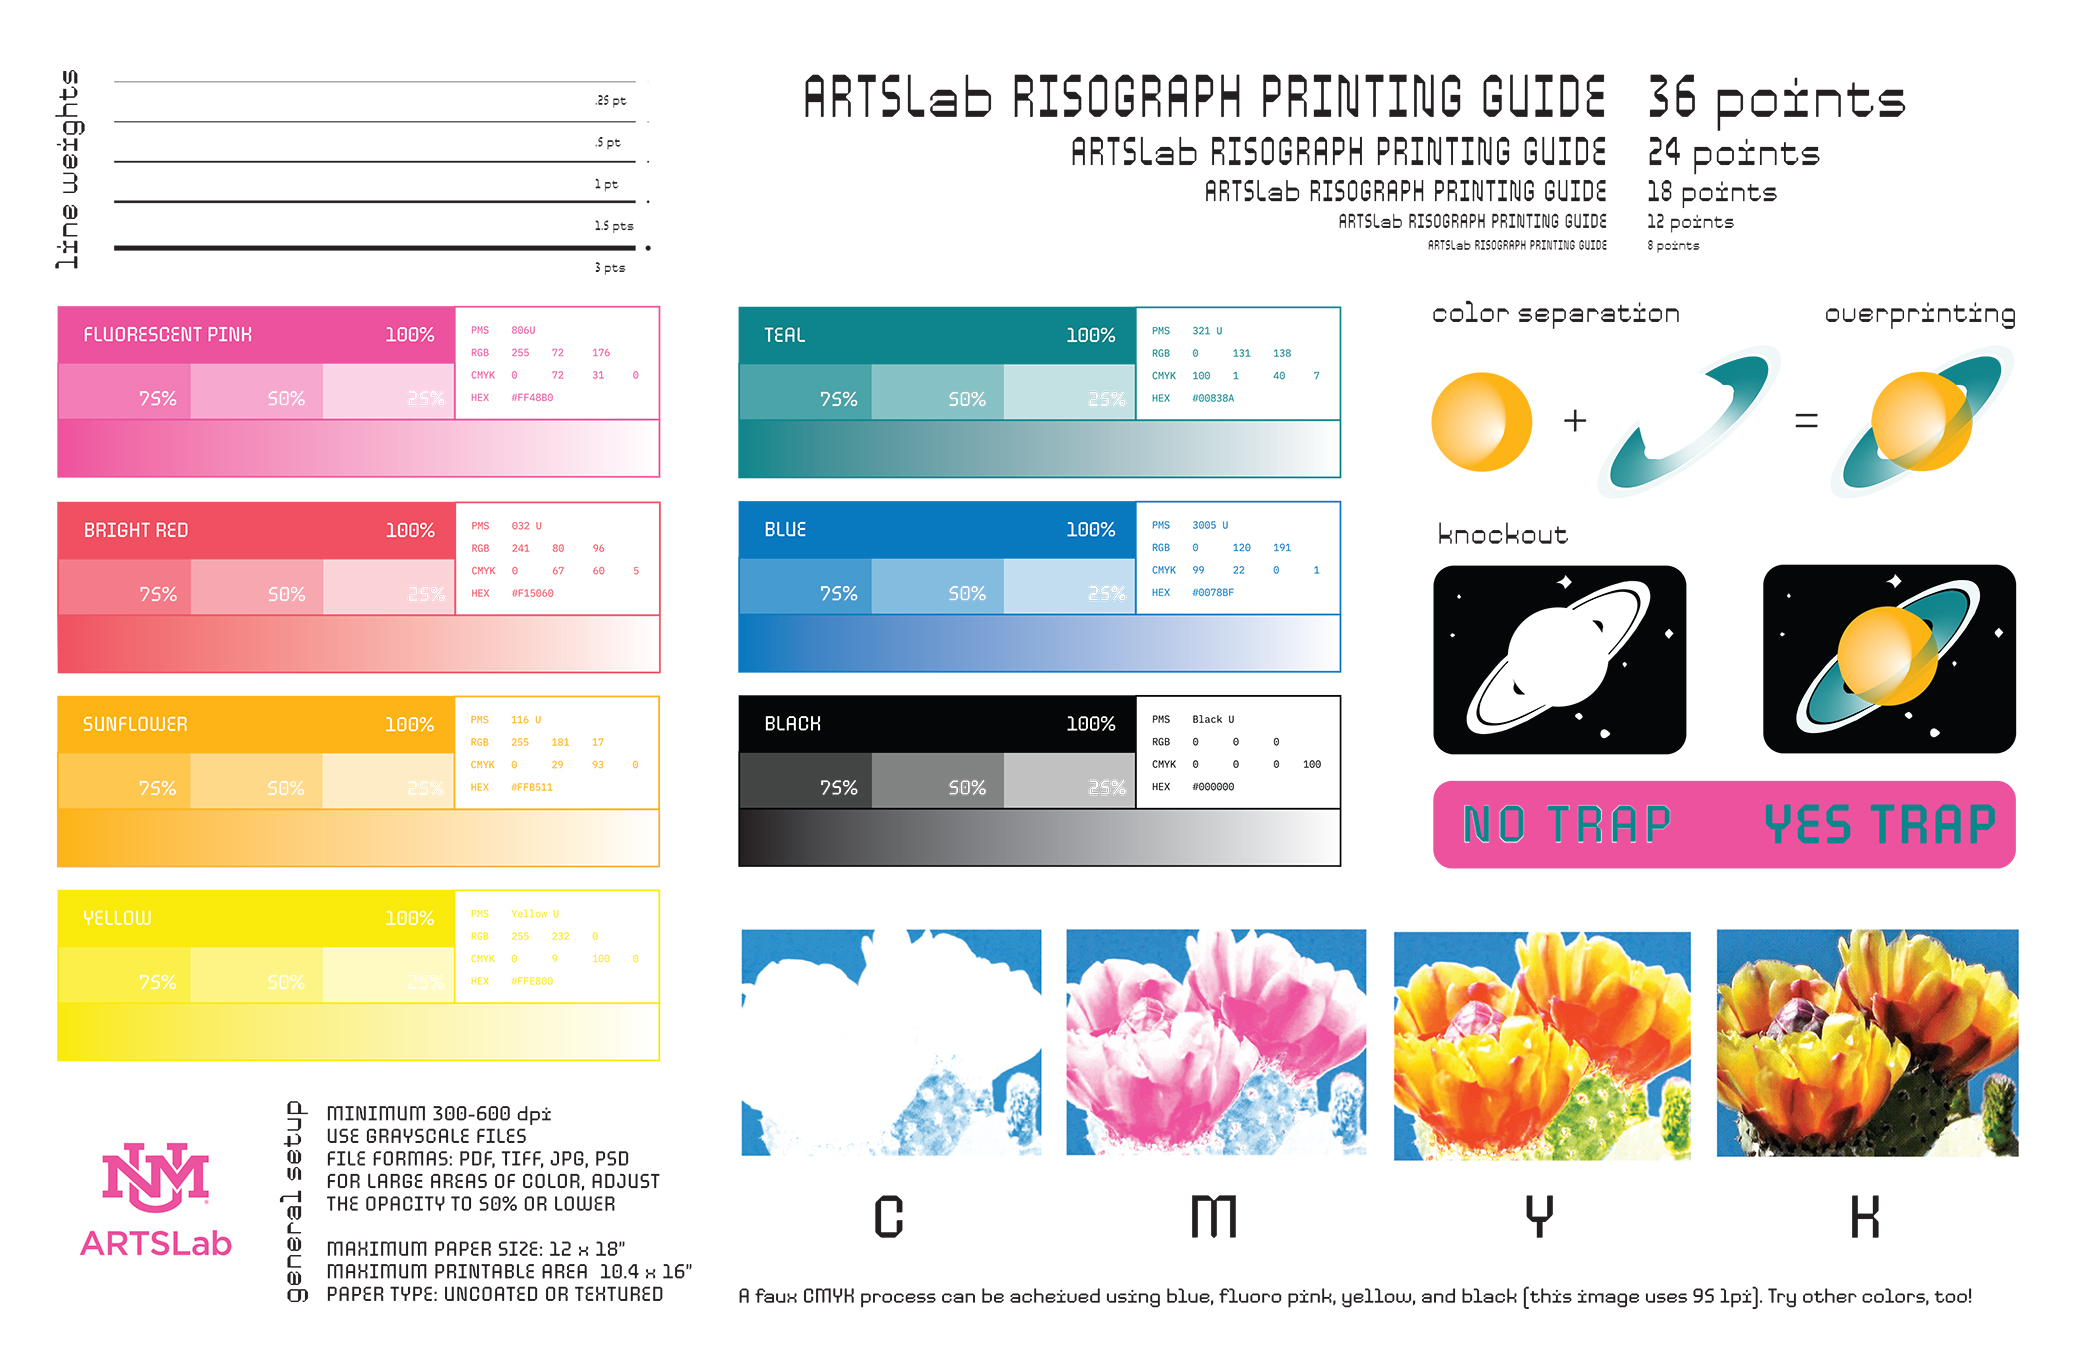
Risograph ink is translucent, so its final appearance depends on the color of the paper it is printed on, the layering of each ink, the saturation of color (10%-100%), and how the overlay of colors can mix and create secondary or tertiary colors. We currently have 7 standard ink colors to choose from, and sometimes we are able to offer special ink colors.
This chart shows the ARTSLab library of inks and their codes as well as some basic design principles. The color swatches below are for visual reference only, as finalized files will need to be in grayscale for printing. See "File Design" tab for more information.
Key Reminders for Planning your Design
- We recommend setting your files up as much as possible before coming in, that way, you can use your time at ARTSLab to make adjustments or experiment with your design. Plan your layers, color selections, and print order. Whether you're printing from a digital file or scanning a physical drawing on the scanner bed, make sure to separate each color into separate pages or layers.
- All files must be sent to the printer in grayscale because it reads value, not color. The color is added as the paper passes through the specified ink drum during the printing process. Prepare your artwork or layers in grayscale and set the resolution to 300 dpi in Photoshop. There is a free program called Spectrolite (available for Macs only) where you can explore different color combinations for your artwork and then Export the risography-ready files that you use to print. Using this program is covered in the risograph training.
- If you're printing a digital file, please save your file on your device or upload it to your Google Drive. If you're scanning artwork, bring your files to your appointment. Photoshop, Illustrator, and Spectrolite are all installed on the ARTSLab computer.
Risograph can print from both physical art as well as digital files. Physical art, like collage or drawings, are scanned through the bed. Digital files are sent directly to the Riso. When creating artwork for riso printing, remember that the machine will translate the value for color based on its opacity scale. In other words, look at value when designing for each color. Look at the "Our Inks” to get a better understanding of value and saturation.
Size of Printable Area
It is not possible to print full-bleed designs on the Risograph. In other words, the ink will not run off the page but you can create a full bleed by post-trimming after your print dries.
Anything outside of the measurements listed below will become fuzzy near the edges. We recommend setting up your files within these dimensions.
- Notecard (3 15/16” x 5 13/16”) — minimum size
- Letter (8.5" x 11"): Printable Area 7.5″ x 10"
- Tabloid Size (11" x 17"): Printable Area 10" x 16"
- A3 (11.7" x 16.5"): Printable Area 10.4" x 16" — maximum size
Check out the “Layouts & Templates” tab for both Illustrator and Photoshop which already have handy guidelines to set up your file.
Font Type Size
The type size should not be below 7pt. If you plan to use two colors when printing the same text, consider misregistration and the motivation behind using two colors For example, will the text be readable at 7pt in two colors?
Registration & Trim
Add registration marks to match up overlays. Add trim marks to trim your print to your desired size.
Additional Digital Printing Prep
The criteria above and below should be included in your file preparation for printing digital files.
Resolution
The Risograph has a resolution of 600 dpi, but we recommend 300 dpi resolution for your files. This is because files that are larger resolution take longer to print, and you only ever need 300 dpi with the paper sizes we offer.
Naming Convention
Format Example: Name_Riso colors in order of layer.pdf
UNM_LightLime-Red-Purple.pdf
Flattening Images (if using Adobe Acrobat)
When preparing your digital file, you must flatten, merge, or rasterize layers before each color/layer as a PDF. Once you flatten your image, the effects that you applied in your file will become embedded as part of the artwork. This step will help you avoid effects in your images, such as jagged, blurry, or images with unintentional drop shadows.
Sourcing Paper
The Risograph can print on uncoated paper between 20# to 100# (80gsm to 300 gsm). Due to the nature of Riso ink, only use absorbent, non-coated paper. Using absorbent paper will minimize potential smudging. Check that your paper is not coated, which has a glossy finish. Riso ink will not dry on coated paper.
At ARTSLab, we have a few sample books of paper to look through to help you find what you need.
Which paweight is right for your project?
-
Text is a lighter weight paper that works best for flyers, folded or rolled items, zine pages, etc. Good examples are the standard paper loaded into computer printers, the pages in a book, or letters.
-
Cover is the heavier weight paper and works best for cards, posters, art prints, and book covers. Think of postcards, brochures, and bookmarks.
-
Double thick cover, or DTC papers, cannot be used in our machine.
Which texture is right for your project?
- Eggshell is recommended for most prints for its rich saturation
- Smooth is recommended for photographs and highly detailed artwork
Local Paper Sources:
- Clampitt Paper
- Sandia Paper Company
- Sandia Office Supply (for text weight papers)
Regional Sources (for specialty papers):
- Kelly Spicers Stores (Tucson, AZ)
- Astro Paper & Envelopes (Vista, CA)
Layouts & Templates
Below are some templates based on standard sizes free for you to use. If there is one you’d like us to add, let us know!
A3 (11.7 x 16.5 in)
Ideal for posters or large prints.
- Illustrator: A3 Template (with bleed guides and trim marks)
- Illustrator: A3 Template (with guide no trim marks)
- Photoshop: A3 Template (with bleed guides and trim marks)
- Photoshop: A3 Template (with guide no trim marks)
8.5 x 11 inches
Ideal for fliers or medium-sized prints. The templates below are for layout 8.5" x 11" letter paper but can be printed on A3 (11.7" x 16.75").
- Illustrator: A4 Template (1 up with bleed guides and trim marks)
- Illustrator: A4 Template (2 up with bleed guides and trim marks)
- Photoshop: A4 Template (2 up with bleed guides and trim marks)
A5 (5.83 x 8.27 in)
Ideal for postcards or fliers. Templates below are for layout A5 but are printed on A3.
- Illustrator: A5 Template (2 up with bleed guides and trim marks)
- Illustrator: A5 Template (4 up with bleed guides and trim marks)
- Photoshop: A5 Template (2 up with bleed guides and trim marks)
- Photoshop: A5 Template (4 up with bleed guides and trim marks)
A5 Booklet or Zine (5.83 x 8.27 in)
The templates below are for layout A5 but are printed on A3. You can duplicate the document or artboards depending on how many pages you want in your zine. If you're printing double-sided, we recommend making a physical sample so you can visualize your pagination.
- Photoshop: A5 Template (4 pages with bleeds and trim marks)
- Photoshop: A5 Template (2 pages with bleeds and trim marks)
- Illustrator: A5 Template (2 pages with bleeds and trim marks)
Binding Equipment
- Paper Jogger
- Booklet Stapler
- Rotary Paper Trimmer
- Guillotine Paper Cutter (cuts up to 12 x 18”)
- WireMac31 Spiral Binder
- This instructional video shows the basic process. This machine has a 3:1 pitch (the measurement between spirals). With square holes, it looks like wire instead of plastic coils are more often used. Here's one place to get wire combs.
- Martin Yale 1217A Automatic Paper Folder
- Automatically feeds, folds and collects a stack of documents from 4" x 4" to 12" x 18" from 18-135 lb. stock, at 10,300 sheets/hour. Creates seven different fold types: Letter, Z-fold, Half, Double-Parallel, Gate, Engineering and Church fold. See instructions on setting up your project here.
- Bindomatic Flex (Thermal Binder)
- This tabletop machine can accommodate a spine up to 2" in size and can handle oversized documents, up to 14 ⅞" in height. Best for legal-sized documents, standard letter size, and mini documents.
- This instructional video shows the process for perfect binding your documents. This page sells a variety of cover options for your document.
Online Resources
Spectrolite
The Spectrolite app is a great tool for printing with multiple colors. It offers automatic color separation, basic design capabilities, and various tools and templates. We have this app downloaded on our computer in the Riso Lab. It’s free to download and only available for Macs.
Riso Wikipedia
Wikipedia for Risograph printing includes history, helpful definitions, and more.
Stencil Wiki
Riso printing resource including print shops, upcoming events, details about inks, and more.
[color/shift] profiles
[color/shift] is an open-source Risograph color profile hub.
RisoLAB Print Archives
RisoLAB is a Risograph printing and publishing education center at the School for Visual Arts in New York City. They offer in-person and online courses in Risograph design and printing. Their online archive and gallery contain digitized works by over 700 artists since 2015.
Risolve Studio
Risolve Studio is a risograph studio located in Lancaster, Pennsylvania. Risolve provides print and graphic design services as well as education for new printers. We like to look at the free color profiles they offer for inspiration.
Albuquerque Print Shops
Risolana
Risolana is a community risograph studio in the South Valley dedicated to accessible art printing, artist workshops, and community engagement.
Next Chapter Studio
Next Chapter Studio is a design and print shop that specializes in Risograph printing, creating greeting cards, stationery items, and art prints.